How to hack blogger: Add a picture to your header
- Log in to blogger- On your Dashboard, select Layout. This will take you to the Template tab. Click Edit HTML. Under the Edit Template section you will see you blog's HTML.
- Tick Expand Widget Templates
- Scroll down the HTML and look for the code listed below:
Follow these simple steps to display a picture in your blogs header.
[You could also to a 'Find Text (Ctrl + F)]
- Our aim to to make the blog header as cutomizable as possible. To achieve this, make the following changes to the code:
Change maxwidgets to 3 (You can make this any number you choose)
Change showaddelement to yes (This is to make the Add Page Element option display under Page Elements)
Change the locked option to false
- Your code should now look like this:
- Save your template and we're done!
Subscribe
Suggested Reading
- How to hack blogger: Display AdSense inside your post
- How to hack blogger: Removing the no follow attribute
- How to hack blogger: Removing the navbar
How to hack blogger: Display AdSense inside your post
Despite blogger's ease of use and all-round simplicity there are still some things that bloggers find difficult to do. One of these things is displaying AdSense in the body of your post. Achieving this is very easy once you know how. Read on to learn how:
- Log in to blogger- On your Dashboard, select Layout. This will take you to the Template tab. Click Edit HTML. Under the Edit Template section you will see you blog's HTML.
- Tick Expand Widget Templates
- Scroll down the HTML and look for the code listed below:
This HTML code represents the body of the posts in your blog.
- Paste your AdSense code directly above the HTML code shown above.
- Now for an important part. Take note of the the < and > in red boxes below.
- Change the < to  and the > to
- Your AdSense code should now look like this:
- Save your Template.
From now on, AdSense will be displayed between the post title and the body of your blog posts [Exactly how it's displayed on this blog]
NOTE: Remember that AdSense limits the number of ad blocks to three per page so in this case ads will be displayed in your blogs first three posts.
How to hack blogger: Removing the nofollow attribute on comments
By default, all blogger templates have the nofollow attribute enabled. This is done primarily to prevent comment spam (i.e people posting links to dodgy sites)
The nofollow attribute, when enabled, instructs search engine crawlers to not follow the link, thereby preventing spam content from being indexed.
This post will show you how to remove the nofollow attribute, thereby making your blogs comment section do follow! We do this because, any comment with a link in it will get counted as a backlink which increases the popularity of the site whose link was left. The more real links you have on other websites, the better for your site as search engines will count these links towards your sites popularity, which can greatly help boost your page-rank.
If your worried about spam, simply enable comment moderation in your blogger settings. Here's how to remove the nofollow attribute:
- Log in to blogger- On your Dashboard, select Layout. This will take you to the Template tab. Click Edit HTML. Under the Edit Template section you will see you blog's HTML.
- Tick Expand Widget Templates
- Scroll down the HTML and look for the code listed below: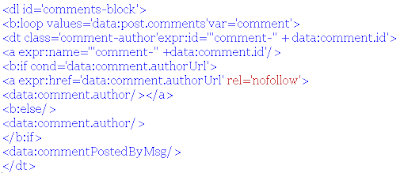
The above listed code pertains to your blog's comment block.
- Notice the red text: rel='nofollow'
- Delete rel='nofollow' and save the template. We're done!
How to hack blogger: Removing the navbar
Ever wondered how to get rid of that annoying Navbar at the top of the screen? Well, wonder no more! Follow this simple procedure and say bye-bye to the blogger Navbar for good:
- Log in to blogger
- On your Dashboard, select Layout. This will take you to the Template tab. Click Edit HTML. Under the Edit Template section you will see you blog's HTML.
- Tick Expand Widget Templates
- Paste the code below directly above the #header-wrapper line in your blog's HTML.
#navbar-iframe {
height: 0px;
visibility: hidden;
display: none;
}
NOTE: Use (Ctrl + F) and type in #header-wrapper to quickly find the #header-wrapper line.
- Save your template and we're done!
From now on whenever anyone visits your blog, the blogger navbar will no longer be displayed.
