How to check your Google Page-Rank
Use the free tool below to quickly check the Google Page-Rank of any website.
| Check Page Rank of any web site instantly: |
Powered by Page Rank Checker service |
How to Increase your blog's traffic by commenting
Millions of blogs today are faced with the same basic problem- How to increase traffic!
One of the most simple yet effective ways of doing so is by commenting! Now I'm not talking about comment spam where you simply paste the URL of your blog and leave. Hit-and-run tactics like that will only ensure that your 'comments' never get approved which means they will never appear on the site in which you posted them. More than that though, both you and your blog will come to be alienated by the blogosphere in general.
Rather, stick to these basics:
>> Your comments should be pertinent to the article.
>> You are entitled to your own opinion, but your comments should not contain any profanity or offend!
>> Try to be unique, but do not be scared of being critical. Often a difference in opinion is seen as a refreshing change and people may be more willing to visit your site because of your honesty and different views.
>> Your comment should not be a lame one liner like 'Great site'. Most moderators reject such comments anyway as they are seen for what they are...Spam!
Now that you have some basic ground rules, where should you be posting your insightful comments?? For starters try these high-traffic blogs:
1. Copy Blogger
2. John Chow
3. ShoeMoney
4. Problogger.net
5. Pronetadvertising.com
6. QuickSprout.com
7. eMomsAtHome.com
8. DoshDosh.com
9. AndyBeard.eu
10. 37Signals.com
These blogs receive thousands of unique visitors daily and posting quality comments on a regular basis with a link back to your blog will definitely bring you an increase in traffic.
While I haven't been commenting of high-traffic blogs for very long, I have noticed a significant increase in traffic in recent weeks.
You can also visit blogs that fall under the same category as your own. Posting comments on sites similar to your own will bring you traffic from people who are interesting in the same niche!
Suggested Reading
- Join the do follow bloggers and increase traffic
- How to hack blogger: Display AdSense inside your post
- The 10 most common passwords
How to clean DVD and CD discs
A few handy tips on how best to clean your collections of CD's and DVD's:
» If dust particles are sticking to the CD surface, use a piece of soft cloth to wipe off the dust. To hold the CD, insert a finger or thumb inside the center hole of the CD or handle it by the edges but never touch the shiny surface.
» If the DVD surface feels sticky or greasy, mix some baby shampoo in lukewarm water and use cotton or soft cloth to gently rub the CD surface with this solution. Make sure the CD is completely dry (no water drops) before putting it back in the jewel case.
» If there are fingerprint marks on the CD surface, dip a soft cloth in Isopropyl Alcohol/Ethanol/Methanol and gently wipe the surface. Never use a petroleum based solvent like Acetone as that will permanently damage the CD surface.
» When none of the above alcohol based products are available in the local market, use a bottle of Mineral water to clean the dirty CD surface. Normal tap water has higher concentration of salts that may leave white marks on the CD surface.
» Always wipe the disc surface in a non-radial back-and-forth motion (from the center hole to the outer edge). Don't follow the concentric circles while cleaning.
Source
Suggested Reading
- How to clean your LCD screen without damaging it
- How to disable writing to USB devices in Windows Vista
How to hack blogger: Add a picture to your header
- Log in to blogger- On your Dashboard, select Layout. This will take you to the Template tab. Click Edit HTML. Under the Edit Template section you will see you blog's HTML.
- Tick Expand Widget Templates
- Scroll down the HTML and look for the code listed below:
Follow these simple steps to display a picture in your blogs header.
[You could also to a 'Find Text (Ctrl + F)]
- Our aim to to make the blog header as cutomizable as possible. To achieve this, make the following changes to the code:
Change maxwidgets to 3 (You can make this any number you choose)
Change showaddelement to yes (This is to make the Add Page Element option display under Page Elements)
Change the locked option to false
- Your code should now look like this:
- Save your template and we're done!
Subscribe
Suggested Reading
- How to hack blogger: Display AdSense inside your post
- How to hack blogger: Removing the no follow attribute
- How to hack blogger: Removing the navbar
How to clean your LCD screen without damaging it
As LCD screens become more and more popular, a question people often ask is 'How do I clean my LCD screen without damaging it?'
Well, over the years, I've come across people that have used commercial window and glass cleaners on their LCD screens. This is a bad idea and you should NEVER use these products on your LCD's as they often contain ammonia, which can, over time, damage your LCD's panel!
Another thing to avoid is paper towels!! A slightly-damp cloth, like the kind included with eyeglasses should be used If you see streaks, use a dry cloth immediately after a damp one. Using water on your cloth is perfectly fine, however, nothing stops you from using commercial LCD panel cleaner. Just remember that these cleaners are often just a simple 50/50 mixture of water and isopropyl alcohol which you can quite easily mix yourself at home.
An important thing to remember is to NEVER spray the liquid directly onto your screen. Moisten the cloth instead. Use a firm motion but don't press too hard or your may damage your panel.
How to rename the recycle bin in Windows XP
Personalize your Windows XP recycle bin by following these simple steps:
- Press Windows key + R (This brings up the Run dialog box)
- Type regedit and press Enter (The open up Registry Editor)
- Navigate to:
HKEY_CURRENT_USER\Software\Microsoft\Windows\ShellNoRoam\MUICache
- Double-click the string value: @C:\WINDOWS\system32\SHELL32.dll,-8964 [see pic below]
- Change the value to whatever you choose and click OK.
- You can now close Registry editor.
How to "Save as PDF" in Microsoft Office 2007
Microsoft Office 2007 was initially supposed to ship with native save to PDF support. However, due to a tussle with Adobe, Microsoft had to remove "save to PDF" and XPS export capabilties from the entire Office 2007 suite.
That's not the end of it though!
Microsft has since released a free plugin that lets you export documents from any Office suite program directly to PDF format without need for a third party PDF printing driver. The plugin is compatible with Word, Excel, Powerpoint, Access, Publisher Infopath, Visio, and OneNote.
Download the Office 2007 plugin:
Save as PDF
Save as XPS
How to give email an expiration date in Outlook 2007
You can give messages you send in Outlook an expiration date. Once the expiration date has been reached the message header is still visible in Outlook, it will however have a strikethrough. The email can still be opened and accessed but will give give the recipient the indication message is no longer relevant.
- Create a new email message
- In the Ribbon, goto Options on the Message tab.
- In the bottom right corner click the arrow pointing downward
- In the message options window under Delivery Options tick the expires after checkbox. Select the desired date and time.
- Now click Close
How to hack blogger: Display AdSense inside your post
Despite blogger's ease of use and all-round simplicity there are still some things that bloggers find difficult to do. One of these things is displaying AdSense in the body of your post. Achieving this is very easy once you know how. Read on to learn how:
- Log in to blogger- On your Dashboard, select Layout. This will take you to the Template tab. Click Edit HTML. Under the Edit Template section you will see you blog's HTML.
- Tick Expand Widget Templates
- Scroll down the HTML and look for the code listed below:
This HTML code represents the body of the posts in your blog.
- Paste your AdSense code directly above the HTML code shown above.
- Now for an important part. Take note of the the < and > in red boxes below.
- Change the < to  and the > to
- Your AdSense code should now look like this:
- Save your Template.
From now on, AdSense will be displayed between the post title and the body of your blog posts [Exactly how it's displayed on this blog]
NOTE: Remember that AdSense limits the number of ad blocks to three per page so in this case ads will be displayed in your blogs first three posts.
How to run MXIT on your computer
So...you want to run MXIT on your PC?! Well you've come to the right place.
For the many that don't know, MXIT is an instant messaging program that runs on cellular phones. It has become extremely popular in South Africa and is used by both young and old alike. Currently, 10 000 new people sign up to use MXIT every day!
There are numerous ways to get MXIT working on your PC. This article will show you the easiest ways to do so. Here's how:
- The base for running MXIT on your computer is a program called mpowerplayer. But before you get to installing mpowerplayer, you need to install Java Runtime Environment (JRE) onto your computer. New versions of the JRE come out all the time. Download whatever version is available from here.
- The next step is installing mpowerplayer. Click here to do So.
- A prompt will appear asking you to either Save, Run or Cancel
Click Run. You will see the following:
- After a little while mpowerplayer should be fully loaded and ready.
MXIT Version 3
Once you have successfully installed mpowerplayer on your computer, getting MXIT V3 working is very simple. Just follow these steps:
- Launch mpowerplayer. You will see a default screen similar to the one below.
- Type mxit in the search box. Almost instantly you will see Mxit displayed [See pic below]
- Click on Mxit. V3 will now launch.
MXIT Version 5
Goto: MXit
- Click Download MXit
- Click Select Phone
- Select Nokia and click Accept
- Select 6230 and click Accept
- Click next to answer the annoying questions
- After you've answered the questions and typed in the in a code that is displayed in an image, you will be asked to select a version. Click Normal
- You will then be asked to save a *.jad file to your computer. Do so.
- Open mpowerplayer, click File -> Open
- Select the *.jad file you just downloaded and click Open.
MXIT V5 will now load in mpowerplayer!
NOTE: You have to repeat this process every single time you want to run MXIT V5 on your computer. This is due to the *.jad file expiring and becoming invalid after a given period of time.
ALTERNATIVELY
If you want to use MXIT V5 without having to download the *.jad file each time, download MXIT V5.1.1 from here
- Open mpowerplayer
- Click File -> Open
- Select the MXit_V5.1.1.jar file you just downloaded and click Open
MXIT will now Launch. This is without doubt the best way to run MXIT on your computer!
NOTE: The modified MXIT V5.1.1 jar file is provided by G4RY
Suggested Reading
- How to recover deleted items in Microsoft Outlook 2003
- How to extend Vista's 30 day activation period
- How to fix 'BOOTMGR is missing" in Windows Vista
- How to disable User Account Control (UAC) in WIndows Vista
- How to make Windows Vista shutdown services faster
- How to increase your blog's traffic by commenting
If you're new here, you may want to subscribe to my RSS feed or email updates. Thanks for visiting!
How to create a distribution list in Outlook 2007
If you send email to the same group of people all the time and find yourself getting tired of manually typing in their email address all the time look no further. Creating a distribution list will let you send email to multiple people without having to type in each and every persons address.
- Go to the Standard toolbar. Click New -> Distribution List
(If your Standard toolbar is not displayed, click File -> New -> Distribution List)
- A blank Distribution List will appear. Type a name for your distribution list.
- Go to the Ribbon and in the Members section, and click Select Members (The Select Members window will appear)
- Simply double-click each contact you want to add to the list. (They will now appear in the Members box)
- Once you've selected all the people you want to add to your distribution list, click OK
- In the Distribution List window, go to the Ribbon and in the Actions section, click Save & Close and you're done!
The distribution list you just created will now appear in your contacts.
How to disable writing to USB devices in Windows Vista
There is a very simple registry tweak we can implement to prevent users from writing data to a USB devices like flash disks or external hard drives. This sort of thing is usually done at schools and company's that don't want their students or employees to download files off the internet or copy sensitive company information, to take home.
To disable writing to USB devices, follow these simple steps:
- Press Windows key + R (This brings up the Run dialog box)
- Type regedit and press Enter (The open up Registry Editor)
- Navigate to:
HKEY_LOCAL_MACHINE\SYSTEM\CurrentControlSet\Control
- Right-click on Control and goto New -> Key [See pic below]
- Type StorageDevicePolicies as the name for the new Key
- Right-click the newly created StorageDevicePolicies and goto New -> DWORD (32-bit) Value[See pic below]
- Type WriteProtect as the name for the new DWORD value.
- Double-click WriteProtect and set its value to 1 [See pic below]
- You can now close Registry Editor.
From now onward, every time someone tries to write data to a USB drive will be presented with a write-protect message!
NOTE: This works for Windows XP as well.
How to open a command prompt from any folder in Windows Vista
I often need to drop to a command prompt to get various tasks done. The ability to right-click a folder and instantly open a command prompt can be very handy indeed. You could do this by way of a powertoy in Windows XP. With Windows Vista it's already there.
- Press Shift and right-click a folder you want to open a command prompt from.
- Select Open Command Window Here[See pic below]
How to enable the hidden boot logo in Windows Vista
By default, Vista does not display a boot logo when starting up. I found this very odd, as all previous version of Windows had a logo of some sort. After some investigating, it turns out that Windows Vista does indeed have a boot logo. You just have to enable it. Here's how:
- Press Windows key + R (This brings up the Run dialog box)
- Type msconfig in the Run dialog box and press Enter (This brings up the system configuration utility)
- Click the Boot tab
- Tick No GUI boot

- Click OK and close system configuration utility. A reboot is required.
The next time you start Vista you will see the boot logo.
NOTE: The scroll bar you usually see may not be displayed.
How to hack blogger: Removing the nofollow attribute on comments
By default, all blogger templates have the nofollow attribute enabled. This is done primarily to prevent comment spam (i.e people posting links to dodgy sites)
The nofollow attribute, when enabled, instructs search engine crawlers to not follow the link, thereby preventing spam content from being indexed.
This post will show you how to remove the nofollow attribute, thereby making your blogs comment section do follow! We do this because, any comment with a link in it will get counted as a backlink which increases the popularity of the site whose link was left. The more real links you have on other websites, the better for your site as search engines will count these links towards your sites popularity, which can greatly help boost your page-rank.
If your worried about spam, simply enable comment moderation in your blogger settings. Here's how to remove the nofollow attribute:
- Log in to blogger- On your Dashboard, select Layout. This will take you to the Template tab. Click Edit HTML. Under the Edit Template section you will see you blog's HTML.
- Tick Expand Widget Templates
- Scroll down the HTML and look for the code listed below: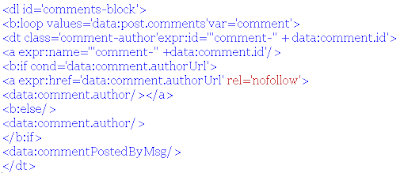
The above listed code pertains to your blog's comment block.
- Notice the red text: rel='nofollow'
- Delete rel='nofollow' and save the template. We're done!
How to uninstall Symantec Anti Virus without a password
When removing Symantec anti virus you often need to supply a password for the uninstall to run. This can be a very big pain if you've forgotten the password or if the original install was done by an administrator that has long since left. As usual, there is a work around. Here's how to remove SAV without supplying a password:
- Press Windows Key + R (This brings up the run dialog box)
- Type regedit and press Enter (This will open the Registry editor)
- Navigate to: HKEY_LOCAL_MACHINE\SOFTWARE\Intel\LANDesk\VirusProtect6\CurrentVersion\AdministratorOnly\Security
- Look for a DWORD value called UseVPUninstallPassword. Once you find it, double click it.
- Change the value of UseVPUninstallPassword to 0 (zero) and click OK [See pic below]
- You can now close the Registry Editor window
- We're done! You will now be able to uninstall Symantec anti virus without the annoying password request!
Suggested Reading
- Download Microsoft's Malicious Software Removal Tool
- How to disable writing to USB devices in Windows Vista and XP
- How to open a command prompt from any folder in Windows Vista
- How to add Blind Carbon Copy (BCC) to Windows Mail
- How to make Windows Vista shut down services faster
- How to detect and remove duplicate files on your computer
If you're new here, you may want to subscribe to my RSS feed or email updates. Thanks for visiting!
How to add blind carbon copy (BCC) to Windows Mail
When you send an email to multiple recipients, you would probably prefer to hide the list of addresses from each recipient. You achieve this by using the blind carbon copy (BCC) function. Windows Mail, by default, has BCC hidden. Here's how to make the BCC option always visible:
- In Windows Mail, click Create Mail
- In the New Message window, click View -> All Headers. The BCC field will now appear and remain visible every time you create a new mail message. [See pic below]
How to recall a sent email in Outlook 2003
Microsoft Outlook 2003 ships with a very handy feature that lets you recall an email that you've already sent. This is very useful, if for example, you've forgotten to attach a document to a message that you have already sent or maybe mistakenly typed the wrong time for an important meeting. Here's how you recall an email:
- Click Sent Items. Select and email and open it.
- Once the message has opened, click Actions -> Recall this message
To recall the email:
- Select Delete unread copies of this message(The recipient needs to have Outlook opened for this to work)
To replace the email:
- Select Delete unread copies and replace with a new message, click OK. Now type your new message.
- Tick Tell me if recall succeeds or fails for each recipient. Click OK
How to delay sending or schedule a message in Outlook 2003
Ordinarily when you click Send in Outlook your email is sent immediately if you're connected to the the internet. In some cases though, you may want to delay the sending of an email or perhaps schedule it for later sending. This is how you do it:
- In the message window, click Options
- In the Message Options dialogue box, tick Do Not Deliver Before and choose your desired send date and time from the drop-down menus.
- Click Close. Now click Send
Your message will now sit in your Outbox waiting to send and the date and time you specified.
How to increase the number of simultaneous download in Internet Explorer 7
Have you ever wanted to download more than 2 files at once with IE7? By default IE7, lets you download only two files concurrently. This limitation, not found in other browsers can be quite annoying. As usual, there is a simple way to overcome this. Here's how you do it:
- Close Internet Explorer 7
- Press Windows key + R (This will bring up the Run dialog)
- In the Run dialog box type regedit and press Enter
- Navigate to: HKEY_CURRENT_USER\Software\Microsoft\Windows\CurrentVersion\Internet Settings
- On the right hand window pane you will see multiple string and DWORD values. Ignore them.
- Right-click anywhere in the white space and select New -> DWORD Value
Name it MaxConnectionsPer1_0Server (The 0 is a zero)
- Double click MaxConnectionsPer1_0Server and change its value to 5 (This number represents the preferred maximum number of downloads- Set it to whatever you want to)
- Now, for a second time right-click anywhere in the white space and select New -> DWORD Value
Name it MaxConnectionsPerServer
- Double click MaxConnectionsPerServer and change the value to 5.
Once done, you can close the Registry Editor window.
From now onward whenever you launch Internet Explorer 7, you will be able to download as many files as you have specified in the values mentioned above.
